Evercreech postscriptSince this quiz photo was added to the Nine Elms website it has produced a number of interesting responses. Whilst the location illustrated in the photograph is far removed from any direct link to Nine Elms depot, I thought the item was worth keeping with its own page in the 'Gallery' section - Shedmaster
Photo Quiz
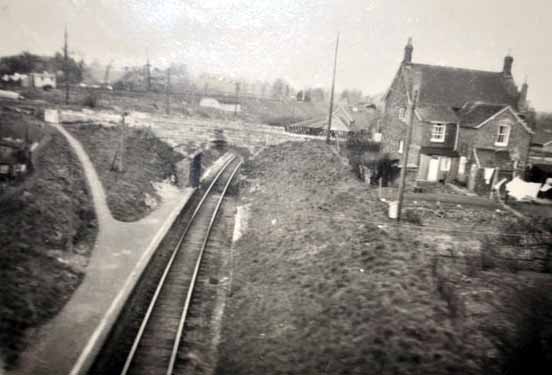
 Here is a photo quiz for you - simply we are asking for the location of the picture. One clue is that it is some way west of Weybridge! Thanks to Tim Crowley for the loan of the photo - copyright Adrian Vaughan Any answers to: shedmaster@nineelms.svsfilm.com The caption on the reverse of the photo says "Templecombe Lower, Somerset and Dorset. Looking towards Bath". However, from the comments received this is clearly incorrect. Shedmaster Here are some of the responses received: Alan Goodwin has commented "... I obtained my information from the book 'A historical survey of the S & D', which has track and signal diagrams of all the stations and junctions. The picture matches the diagram of Evercreech Junction, right down to the odd looking signal on the right. Perhaps someone could tell me what that was for."
John Middleditch has sent this photo (his copyright): The funny signal is an S&DJR speciality know as a backing signal. This allows trains back into yards or onto other lines. The one shewn in your photo was used to authorise a driver to set back onto the down main and then onto the branch.
Jeremy Clarke emailed: A question was also posed about the signal on the right of shot. This was a peculiarly S&D type, a 'backing' signal. In this locality it permitted a train standing on the down line beyond the junction to back across on to the down branch or into the down marshalling yard. A signal of this type at Midford permitted a driver who had not successfully accomplished the climb to Combe Down tunnel - almost always a heavy freight train - to back into and through Midford station in order to take another run at the gradient.
Chris Knowles-Thomas replied:
Peter Smith (ex Branksome and Bournemouth Central Engineman) wrote:
Brian Aynsley emailed:
Peter Smith wrote again: Freight trains bound for the Highbridge line departed via the lengthy No 2 siding, which can be seen running behind the signal box. A ground signal, sited beyond the box, controlled the exit from No. 2 siding and routed these trains directly onto the branch line.
Chris Osment wrote: Firstly, the lower ringed arm was NOT for the exit from the yard (which was controlled by the ground disc signal). This ringed arm related to the main line and allowed trains to draw forward onto the Up Branch line. Secondly, the 'backing' or 'wrong road' signal on the right of the picture was NOT a "SDJR speciality", but rather a feature of signalling done by Stevens & Sons and could be found elsewhere on the L&SWR and other railways. Unfortunately there are number of pictures of signalling items which often appear in books or websites because they appear to be 'unusual', but are then accompanied by inaccurate captions. The Up Homes at Evercreech Junction North are so commonly mis-described that I resorted to a creating a specific web-page ( www.trainweb.org/railwest/gen/errors/ejn-signals.html ) about the problem! However I think your website if the first time that I have encountered two different signal 'errors' in the same picture. As a footnote, with regard to the 'wrong road' signal on the bracket at the right of the picture, since sending my original comments to you I have learnt that the Somerset & Dorset Railway Heritage Trust (S&DRHT - which is not the same as the S&DRT, just to confuse people!) are constructing a signal to a similar design for erection in due course at their site at Midsomer Norton South station. Chris Osment, SDRT Signalling Steward, SRS Corresponding Member for S&DJR, West Country Railway Archives.
Daniel Holden-Storey posted on Nine Elms Facebook page: I noticed on the Evercreech Junction - quiz photo responses a picture of Templecombe Lower platform. I recall that on Friday 4 March I caught the last evening train from Bournemouth (Central) to Templecome, where I was staying the night. To my surprise a spanking clean 'Biggin Hill' appeared at the front of the train and took our train all the way to Templecombe where the train terminated at the Lower platform. I was somewhat surprised but on reflection guess that must have been the last train ever to call at the Lower platform. A bit of history unless I'm mistaken. Next day of course immaculate Biggin Hill and Bude took the tour over the Mendips and the rest is history.
|
|
Site sponsored/maintained by SVSFilm © 2015 ... Go to SVS Film Index Go to Nine Elms Main Index - "Light to Loco" |